
Drawing a realistic heart is more than sketching a simple symbol on paper. It is an artistic journey that combines observation, patience, shading, texture, and emotion. Whether you are a beginner holding a pencil for the first time or someone looking to improve artistic skills, learning how to create a lifelike heart can be both exciting and rewarding. A realistic heart drawing has the power to capture attention because it blends science, creativity, and storytelling into one visual form.
Think of drawing a heart like building a house brick by brick. You cannot rush the process if you want a strong and beautiful result. Every line, shadow, and detail contributes to the final image. The good news is that anyone can learn with practice and the right guidance.
In this article, you will discover techniques, tools, shading methods, anatomy basics, and creative ideas that can help you produce stunning heart illustrations with confidence.
Understanding the Structure of the Human Heart
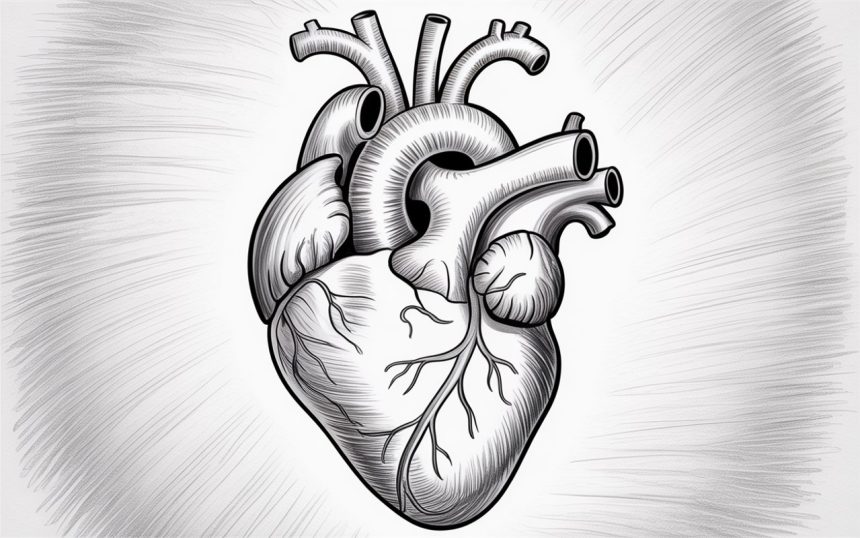
Before putting pencil to paper, it helps to understand what the human heart actually looks like. Many people imagine a smooth shape, but the real organ is far more detailed. It contains veins, arteries, curves, folds, and muscular textures that give it a distinctive appearance.
Nestled slightly left of center in the chest, the human heart works tirelessly as the body’s powerful engine, circulating blood and sustaining every vital function. It moves blood through veins and arteries nonstop. This natural complexity is what makes realistic artwork so fascinating.
When artists study anatomy, they begin noticing details that casual viewers often miss. The large arteries at the top, the uneven surface, and the twisting vessels all add realism. Observing reference images can significantly improve accuracy and help you understand proportions.
A strong understanding of structure acts as the foundation of your artwork. Without it, even excellent shading may feel incomplete.
Choosing the Right Drawing Materials
The tools you use can make a major difference in the final result. You do not need expensive supplies, but having reliable materials helps create smoother textures and cleaner shadows.
A graphite pencil set is one of the best starting points. Softer pencils produce darker tones, while harder pencils create lighter lines. Blending stumps can soften transitions between shadows and highlights, making the drawing appear more realistic.
Good-quality paper also matters. Thin paper can smudge easily or tear during shading. Heavier paper allows better layering and smoother blending.
Some artists prefer charcoal because it creates dramatic contrast, while others enjoy colored pencils for a more medical illustration style. Experimenting with different materials helps you discover your artistic preferences.
Here are some commonly used tools:
- Graphite pencils
- Charcoal pencils
- Erasers
- Blending tools
- Fine liners
- Sketch paper
- Colored pencils
Remember, tools are only part of the process. Even a simple pencil can create incredible artwork in skilled hands.
Starting With Basic Shapes
One of the biggest mistakes beginners make is trying to draw every detail immediately. Professional artists usually begin with simple forms before adding complexity.
A realistic heart can initially be broken down into oval and cylindrical shapes. This rough outline helps establish proportions and placement. Think of it as building the skeleton of the drawing before adding skin and texture.
Light sketching is important during this stage. Heavy lines can become difficult to erase later. Instead, use soft strokes that guide the structure without locking you into mistakes.
Once the basic shape looks balanced, you can slowly add arteries, chambers, and surface details. This gradual approach makes the process feel less overwhelming.
Patience is essential here. Rushing often leads to distorted proportions that become harder to fix later.
Observing Light and Shadow
Shading is what transforms a flat sketch into a realistic image. Without proper lighting, even detailed drawings can look lifeless.
Every object reacts differently to light, and the human heart is no exception. Its wet, muscular surface reflects highlights while deeper folds create dark shadows. Understanding this contrast is key to realism.
Imagine shining a flashlight on a sculpture. Some areas glow brightly while others disappear into darkness. Your drawing should mimic this natural behavior.
Start by deciding where the light source comes from. Once you establish that direction, shadows should remain consistent throughout the artwork. Inconsistent lighting can confuse the viewer and reduce realism.
Smooth blending creates softer transitions, while sharp shadows add dramatic depth. Combining both techniques often produces the best results.
Creating Texture for a Realistic Appearance
Texture is one of the defining features of a lifelike heart drawing. The organ is not perfectly smooth. It contains muscle fibers, veins, and subtle irregularities that give it character.
Artists often use layered pencil strokes to mimic organic textures. Short, curved marks can create the illusion of muscle tissue, while tiny dark lines suggest veins and creases.
This stage requires careful observation. Looking closely at reference images helps you identify patterns and surface details that make the artwork believable.
Adding texture gradually works better than trying to complete it all at once. Too many details early in the process can make the drawing messy and difficult to control.
One useful trick is varying pencil pressure. Softer pressure creates delicate textures, while firmer strokes add bold definition.
The Importance of Proportions
Proportion plays a major role in realistic art. Even small inaccuracies can make a drawing appear unnatural.
The upper portion of the heart contains major arteries and veins, while the lower section tapers downward into a rounded point. Understanding these relationships helps maintain balance.
Skilled artists often rely on visual measuring methods to accurately balance each section of the drawing and maintain natural proportions. For example, they may estimate the width of the upper chambers compared to the lower section.
A practical approach is stepping back from the drawing occasionally. Viewing your artwork from a distance helps reveal mistakes that are harder to notice up close.
Another helpful method involves flipping the paper or viewing the drawing in a mirror. This simple trick often exposes uneven proportions immediately.
Adding Depth Through Layering
Realistic art depends heavily on depth. A flat image lacks the visual richness that makes viewers pause and admire your work.
Layering is one of the best ways to build depth gradually. Instead of pressing hard immediately, artists apply multiple soft layers of graphite or charcoal. This method creates richer tones and smoother transitions.
Think of it like painting a wall. One thin coat rarely gives perfect coverage, but several layers create a strong and polished finish.
The same principle applies to drawing. Light layers allow greater control and reduce the risk of harsh marks that are difficult to erase.
Highlights are equally important. Leaving certain areas untouched helps create contrast and makes the surface appear shiny or moist.
Studying Anatomy for Better Accuracy
Many artists avoid anatomy because it seems intimidating, but even basic anatomical knowledge can dramatically improve your artwork.
The heart consists of chambers, arteries, veins, and connective tissue arranged in a specific way. Understanding these elements helps your drawing feel more authentic.
You do not need to become a medical expert. Simply learning the major structures and their positions can strengthen your visual understanding.
Anatomy books, online references, and medical illustrations are excellent learning resources. Observing multiple references also prevents copying mistakes from a single image.
Over time, your brain begins recognizing patterns naturally. This makes future drawings easier and more accurate.
Common Mistakes Beginners Should Avoid
Every artist makes mistakes, especially during the learning process. The key is recognizing them early and improving with practice.
One common issue is over-darkening the drawing too soon. Heavy shading at the beginning limits flexibility and makes corrections difficult.
Another frequent problem involves ignoring reference images. Drawing from imagination alone can lead to unrealistic proportions and missing details.
Smudging is another challenge. Resting your hand on the paper may accidentally blur carefully shaded areas. Many artists place a clean sheet under their hand while drawing.
Lack of patience is perhaps the biggest obstacle. Realistic art takes time. Trying to finish quickly often reduces quality and causes frustration.
Mistakes are not failures. They are stepping stones that help you grow as an artist.
Using Color to Enhance Realism
While graphite drawings can look stunning, adding color introduces another level of realism. Reds, blues, purples, and subtle pink tones help mimic the natural appearance of the human heart.
Colored pencils allow gradual layering and detailed blending. Watercolor techniques can also create soft organic textures that resemble living tissue.
The key is subtlety. Overly bright colors may make the artwork appear cartoonish rather than realistic.
Studying real anatomical references helps identify natural color variations. Notice how some areas appear darker due to shadow or blood flow, while others contain lighter highlights.
Blending complementary shades creates richer depth and more believable surfaces.
Digital Techniques for Modern Artists
Traditional drawing remains popular, but digital art has opened exciting possibilities for realistic illustrations.
Programs like drawing apps and graphic tablets allow artists to experiment without fear of ruining the original sketch. Layers can be adjusted, erased, or modified easily.
Digital brushes can replicate pencil, charcoal, ink, and paint textures with impressive realism. Artists can zoom in for fine details and work more efficiently.
Another advantage is flexibility. Mistakes can be corrected instantly, making digital tools especially useful for beginners.
However, strong fundamentals still matter. Technology cannot replace understanding of anatomy, shading, or composition.
Whether traditional or digital, the principles of realistic art remain largely the same.
Finding Your Personal Artistic Style

Realism does not mean copying every detail perfectly. Over time, artists naturally develop their own interpretation and style.
Some artists focus on hyperrealistic detail, while others blend realism with abstract elements. Some use dramatic contrast, while others prefer soft shading.
Your artistic voice develops through experimentation and practice. Do not be afraid to try different techniques, textures, or compositions.
Art is deeply personal. A realistic heart drawing can symbolize love, pain, strength, healing, or life itself. The emotional connection behind the artwork often matters as much as technical skill.
The more you draw, the more confidence you gain. Eventually, your style becomes recognizable and unique.
Practicing Consistently for Improvement
Improvement in art rarely happens overnight. Like learning a musical instrument or a sport, drawing requires consistent practice.
Short daily sessions are often more effective than occasional long sessions. Regular sketching trains your eyes to observe shapes, shadows, and details more accurately.
Keeping old drawings can also be motivating. Comparing early work to newer pieces reveals progress you may not notice day to day.
Challenges and exercises help build discipline. Try drawing the same subject multiple times using different techniques or materials.
The most important thing is enjoying the process. Art should feel rewarding, not stressful.
FAQs
What is the best pencil for realistic heart drawing?
Graphite pencils are commonly recommended because they offer a wide range of shading options. Softer pencils like 4B or 6B are excellent for dark shadows, while harder pencils help create lighter details.
How long does it take to learn realistic drawing?
The learning process varies for everyone. Some people improve within weeks through daily practice, while mastering advanced realism may take months or years.
Do I need anatomy knowledge to draw a realistic heart?
Basic anatomy knowledge is extremely helpful. Understanding the major structures and proportions makes your artwork appear more accurate and believable.
Can beginners create realistic artwork?
Yes, beginners can absolutely learn realistic drawing. Starting with simple shapes, observing references, and practicing shading techniques can lead to impressive improvement over time.
Is digital drawing easier than traditional drawing?
Digital drawing offers flexibility and easier corrections, but both methods require understanding of lighting, texture, and proportions. Neither method replaces fundamental artistic skills.
Conclusion
Realistic heart drawing is a beautiful blend of creativity, observation, and patience. It teaches you how to see beyond simple outlines and appreciate the intricate details of life itself. From understanding anatomy to mastering shading and texture, every step contributes to creating artwork that feels alive.
The journey may seem challenging at first, but each sketch improves your confidence and skill. Remember that even experienced artists started with rough lines and imperfect shapes. Progress comes through practice, experimentation, and persistence.
Whether you draw for relaxation, education, or artistic passion, creating a lifelike heart can become a meaningful and satisfying experience. Pick up your pencil, trust the process, and allow your creativity to grow one stroke at a time.